Monday, October 24, 2011

Skinning, ankles, skirt and feet

Well I've busy for the past couple of weeks. I keep meaning to take pics and update the blog but I kept getting side tracked with other things. Finally remembered to grab the camera tonight and take some shots of what I've been up to.
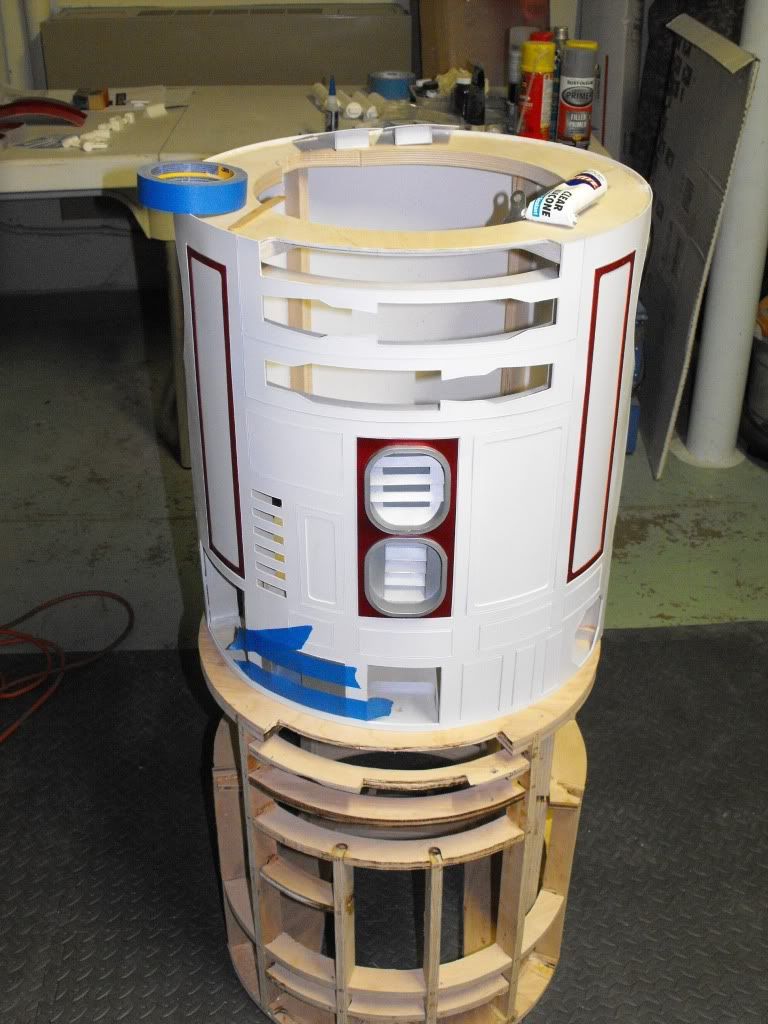
First off, I finally finished up the A&A styrene skirt that I've been glaring at for the past few months. Not the best work I've done but I'm planning on replacing it down the road with either a resin or wood skirt. It still needs a couple coats of clear on top of the Rustoleum Satin White. The inside crevices were filled with silicon first to help strengthen the seams then the body filled half-way with foam. I let it set for 2 or 3 days to make sure it had expanded completely then took a straight blade and sawed off the little bit that went above the surface.


Next up I started skinning the legs with styrene as I didn't have the patience to work with bondo then sand, then more bondo.. etc. Once the two halves of the leg are put together I can attached the skins to the edges as well.


Skinned and drilled holes in the outer plate of the legs so I can mount the horseshoes and added a 'plate' of styrene for the shoulder hub to fit into. I'll be putting a couple of magnets on the backside to help hold those in place.

As I was going through the last items left in my to-do box I found that I was short a couple of beefy resin ankles. As the current supplier for them is a bit busy lately I grabbed some styrene, printed out the patterns and made up a set for the center leg.
Lastly, I finished up the seams in the foot shells and sanded them down. Added the strips on the front and back and slightly enlarged the holes for the knobs. I need to figure out how to attach the curved plate on the inner side while leaving room for the motors. Then they'll be ready for a few coats of paint.

Thursday, October 6, 2011

LDP, Coin Slot and Feet

Big update today as I'm catching up on a few things that I haven't posted yet. Got the LDP installed by putting in spacers under it for it to sit on top of then glued the port in place. 


Next up I had to build up the ends on the coin slot because they were too long and didn't touch the wall of the body. 

Picked up an idea from a fellow builder on how to install the horseshoes when the legs are ready for them. I clamped down the shims to the corresponding shoe then took them over to the drill press. The dowels are 1/4" and will help line up the shoe with the leg. The magnets are 1/2" in width but only an 1/8" thick and are earth magnets. These things won't be slipping once they're connected to a matching magnet.  
 Ahhh.. the utility arms. I've been trying to figure out how to mount these and keep them in place so little fingers can't pry them out. I picked up another idea from another builder who used brackets to help align them and keep them there. Mine won't be on servos so once they're locked in, they'll hopefully stay in place. Again.. little fingers..
Finally broke out the box of A&A foot shell pieces and started putting them together. By doing one a day it helped keep me from getting frustrated and messing something up. I still need to put the battery boxes together but in the meantime I'm using glazing putty to help fill in the joints and smooth them out.

Tuesday, September 6, 2011

Shoulders to Legs to Ankles

   Put the new drill press to use this morning by realigning the holes for the shoulder flanges and leg then glued up the two layers. Using the holes in the first layer I then drilled all the way through and rebolted the two sections together. Oops.. almost forgot to drill a hole for the wires to pass through from the body to the leg.  Outer layer is drying up with the smaller ankle bit and center leg is drying as well.

 Cleaned up the armpits so the details fit then sanded down the sides of the legs to even up the layers. And since I was making a mess I grabbed the ankle cylinders and cut/sanded off the extra bits on the backsides from when they were molded. Just need to fill in any small air holes then they're ready for paint.


Monday, September 5, 2011

Legs, Shoulders and a new toy.

  Finished cutting out the center leg today and the second layer of shoulder circles. Still need to do some trimming in the armpits so the underarm details will fit properly. It helps that I've got the first three layers glued up so all I need to do is clamp the fourth down to do that section. Once I finish getting the holes drilled for the bolts in the shoulder I can finish gluing that piece to the rest of them.
   I've been contemplating a new toy for the workshop for a while now.. A drill press. Using the hand drill just wasn't cutting it even though I've got a good eye for if things are level. That was proven when I tried doing it free hand for the bolts and found they're just slightly off. Getting that set up took up a good portion of my work time but its ready now for me to play with tomorrow. 

Saturday, August 20, 2011

Pocket vents finished


A little more progress today. I'm waiting for the rest of the fumes to air out of the workroom before tackling the next part. I got the pocket vents finished and assembled. Once they've set for a little bit I'll paint them up and install. I've posted progress pics as I was building them. Hopefully this will help others in putting some together. They're easy to build and I'm not sure why I procrastinated so long to do them..
The pieces for the 'pocket' were made up with 2mm styrene while the ribs I improvised and built up using 1mm x3 to match the strips I'd gotten. Those turned out to be too wide when put side by side but worked out fine for the outer edges. The back plates are also 1mm. I curved the pieces to match the body by just simply bending them till they held a slight curve and I borrowed Edwardo's idea to use the utility arm to mark out the curve for the pocket pieces.


Thursday, August 18, 2011

Legs, Side and pocket vent progress

Well with summer for the kids over and time on my hands I got back in the workshop and finished cutting the legs pieces out. They still have the paper pattern attached for the moment so I know what layer is what. Just need to cut out the shoulder circles now.
 Next on the to do list was working on the side and pocket vents. The resin ones I have didn't fit the curve of the body and trying to warm them and bend them to the proper curve didn't work out either. So I decided to start from scratch with styrene. The side vents were the easiest to put together so I got them out of the way first. I used 1mm sheet for the front and .80x.25 strips for the ribs. Another 1mm sheet finished off the back.


Just need to paint them up and install them now then finish up the pocket vents.

Thursday, July 14, 2011

Starting on the legs

No photos this time around. I started rough cutting the leg pieces a couple of weeks ago then had a slight bump due to a broken bandsaw blade. I got back to work on them again today and I'm happy to say that 4 of them are now done. They just need some small detail work in the shoulder area. Will try to get back to work on the other pieces tomorrow or this weekend. After that they get skinned with some styrene.

Wednesday, June 15, 2011

Ports and redoing vents

Got back to work on my little R4 after a few weeks off.  I finished up painting the power couplers and got one installed on the back. Need to do some touch up where the red showed through on the edge. The octagon ports are also now installed with a bit of trimming to the frame so they could sit in the right spot.  Coin returns are also installed..

Got to thinking what I could do with the resin side vents and pocket vents. They just didn't want to fit and while warming them up allowed us to bend them slightly it also created more warp then helping them fit. So.. after much grumbling and digging through my stash of left over styrene I got to work on cutting out new ones. Just need to make a trip to the hobby shop tomorrow for a few things. And remember the paint scheme I have for them.

Tuesday, May 17, 2011

Painting the body

I spent the past weekend painting up the body section then started the process of fitting and gluing in the ports. Yes, that's a second frame she's sitting on.. or rather the first one I started with.

Thursday, April 21, 2011

Skins!

After a small set back with the frame.. had to redo it due to a slight backwards tilt that couldn't be fixed.. I finally got back on track and started getting the inner skins attached.
A few staples just to hold it in place then reinforced with silicon behind the skins where they meet the frame. Details from the outer skins went on next by using some 3M adhesive spray and touched up around the edges with thin CA glue.

Now to work on the back details. Trying to decide if I want to cut the back section to make a door or leave it as is and use the top for putting things inside.

Saturday, April 16, 2011

Inner support ring


Photo of floral rings I used for my styrene dome. These are 18" already so they only need a little bit of trimming after gluing them together to fit inside the dome for support.

Monday, March 21, 2011

Dome update

It's been awhile since I posted something. I've been working on little things like chipping out sections in the frame and dealing with paint that won't stick to some resin pieces. Removed the paint, sanded them down the best I could and now need to finish cleaning the last of the paint if I can so I can start over on them. Definitely a Grrrrr moment. Most of my progress has been on the dome though by getting the all the pieces finished up and the eye is now mounted. Yay!


Worked some more on it this morning and the panels are now attached as well as the HP's. Trying to figure out how to mount the pieces of plastic mik jug that I trimmed out for the PSI's now and how to attach a tube behind that for the lights that will go in later.
Lights! I'm planning on putting BlinkM's in the HP's and behind the PSI's. The logic displays will be fiber optics.. just waiting on all the supplies to arrive now. Last thing to go in will be a switch for the power that runs the lights. I'm thinking behind one of the dome bumps or the top pie panel. 

Saturday, February 26, 2011

I've been a little busy the past few weeks. Mostly working on the frame and cutting here and there so the detail parts fit and getting those parts primed and painted. Inner skins are cut also to help give me an idea of where I need to trim the frame. For some reason when I was fitting the skins on they seemed a little too long.. like about a 1/4" too long. I double checked how deep the grooves were cut on the upper and lower rings and they're at 1/2" like they should be. Skins fit properly around the body so my guess is that the ribs might have been trimmed too short. I made up the missing measurement by adding 1/4" piece of birch to the bottom of the frame which seems to have worked out well.

Since the upper cross beam in the front was too thick instead of the 1/4" that it should have been.. I decided to try and work with it and trim out the section where the utility arm would be sitting. I'll be adding small block of styrene on top for the LDP to sit on when I install that piece.


Other spots that needed trimming were the top ring where the LDP sits, the areas where the octagon ports sit in the front and back and the pocket vents.

Saturday, February 5, 2011

Frame build-up

For the past week or so I've been busy cutting, routing and putting the frame together. Finally got all the little joints glued up and she now has a nice sturdy body to work on. Next step.. skins.

Wednesday, January 19, 2011

More Dome work and some of the frame

Well today was 'Let's get the shop messy' day. I finished trimming up the inner dome around the bottom and cut out the inner section of the dome ring. Now to figure out what to do with that part. Might hang it on the wall. :P The lower section of the ring needed to be trimmed as well to make the width 1" all around. By the time I'd finished doing all of that I had lots of little pieces of melted styrene all over me and the floor. Next on the to-do list was gluing up the 3 floral rings that I got from Michael's. They're about 1/4" thick and just a little too big to fit inside the inner dome. Once they dry I'll trim down the outer edge on the bandsaw so it fits snugly.  You can see they're about the same size as the nylon ring that is used with the aluminum dome. So for about $5 each it was a inexpensive alternative to use with the styrene dome.
 Since I was on a roll I decided to pull the frame pieces off the shelf and work on those. I had already rough cut them a few months ago so they needed trimming up on the bandsaw. Just need to router where they fit together and she'll have a body!

Thursday, January 13, 2011

Progress with the dome

Well I've been busy this past week. I finished up sanding the inner and outer domes so they'd sit flush with each other then trimmed out the areas where hp's and lights will go. Primer went on next on all the little pieces and the outer dome. Then color to see how it would look. I used Tamiya Aluminum and Dupli-color Metal Specks Retro Red. Hard to see the red with this photo so I'll try to get a better one later.
The dome came out fairly well with a couple coats of light grey primer and 3 thin coats of red, letting each coat cure for about a day in between.


You can see the color better in this one with a flash. Smaller pieces aren't permanently attached just yet. I wanted to see how the overall color scheme looked. I need to go in with a fine brush around each edge with some grey paint so the inner dome doesn't stand out so much.. or maybe some black. Hmmm. Also need to remove the painter's tape covering where the radar eye will sit.
 I'm not really sure but I think I'm missing a panel here. I've gone through the box to look for it and nothing there. The area is flat enough though that I shouldn't have a problem cutting out another piece of styrene and adding it here. Also need to finish trimming the bottom edge and the dome plug. Whew, what a week.

Thursday, January 6, 2011

Getting ready to build my first droid

Well its been a little over a year since I started collecting parts for a project that my husband and I have wanted to do for a while. Ever since he discovered there were Star Wars groups out there that actually had movie accurate costumes and the work they did for charity groups he's been hooked. The bug soon spread to myself to spend more time with him and once we both had our own costumes done we turned our eyes to what we could build next. Thus began our collecting pieces for our own droid and building an R4-P17. We wanted something a little different from the normal blue and white.. no offense to R2! And I wanted something not quite as expensive or hard to work with as metal. She'll have a wood frame and legs while the rest of her parts will be made from resin and styrene. So far we have the frame rough cut and started getting the dome sanded and painted. I'll post pics soon.